I recently added the Remote 3 and the OREI UHD-402MV Multiviewer to my setup. After initial testing, I quickly realized that the stock IR remote was a major bottleneck. It lacked discrete power states (separate on/off), audio selection was buried in menus, and cycling through picture modes was a repetitive chore. It made watching TV in various multiview configurations a total pain.
In my search for a solution, I discovered that this OREI unit has an abundance of direct RS-232 serial commands that can do exactly what I want and provide options for intricate macros.
I dove down a deep rabbit hole and found that while the Remote 3 is an incredibly powerful platform, the native Global Caché integration is currently focused on Infrared (IR) and does not support RS-232. However, after some intense trial and error, I’ve found a “bridge” to enable full serial control with another integration “ucr2-integration-requestsPublic”.
I’ve put together this guide to show how to link the OREI UHD-402MV to the Remote 3 using a Global Caché IP2SL-P. This setup allows you to send direct RS-232 commands from your remote to any compatible device. Even if you aren’t using this exact multiviewer, you can easily modify this process to fit your hardware.
It would be interesting to see if anyone else has a similar setup or has found other unique uses for RS-232 integration in conjunction with the circle remote. I’d love to hear your thoughts, suggestions, or any ideas I might have missed!
Global Caché IP2SL-P & OREI UHD-402MV Setup Guide
Prerequisites
Hardware:
-
OREI UHD-402MV
-
OREI DB9 to RS-232 Cable (included with UHD-402MV)
-
Global Caché IP2SL-P
-
Remote 3 (tested on firmware 2.8.3)
Software:
-
iHelp Utility (Recommended)
Integration:
-
ucr2-integration-requestsPublic (kennymc-c/)
1. Hardware Configuration
-
Circle Remote 3: Should be set up and ready to go before proceeding.
-
OREI UHD-402MV: Connect the OREI DB9-to-RS-232 cable to the 3-pin Phoenix port (RS-232) on the back.
-
Global Caché IP2SL-P: Connect the DB9 end of the OREI cable to the unit. Connect the unit to your network via PoE (or power adapter).
-
**Recommended Network Setup: Assign Static IPs** to both the Remote 3 and the Global Caché IP2SL-P. Because this integration relies on a hard-coded YAML “blueprint,” every serial command is specifically directed to the iTach’s current IP address. If the router reassigns a new IP to the Global Caché unit, the “link” will break immediately.
Why this matters:
-
Fixing a broken link caused by a changed IP requires modifying the YAML and performing the lengthy “Clean Reinstall” process detailed at the end of this guide.
-
Setting a Static IP now (via your router’s DHCP reservation or the iTach web interface) saves you from having to rebuild the integration later.
2. Configure the iTach IP2SL-P “Bridge”
-
Locate IP: Download and run the Global Caché iHelp Utility on a Windows PC to find the unit’s IP address.
-
Access Web Interface: Type the IP address into a web browser.
-
Serial Settings: Navigate to the Serial tab and match the OREI’s specs:
-
Multiple Ports: Disabled
-
Baud Rate: 115200
-
Flow Control: None
-
Stop Bits: 1
-
Parity: None
-
Data Bits: 8
-
3. Install Remote 3 Integration
-
Download: Get the uc-intg-requests-vX.X.X-aarch64.tar.gz from the kennymc-c GitHub Releases. (Do not unzip).
-
Upload: In the Remote 3 Web Configurator, go to Settings > Integrations > Add New (+) > Install custom integration and upload the file.
-
Initialize: It will appear as “HTTP requests, WoL & text over TCP”.
4. Configure custom entities
-
Set up: Under integrations select: “HTTP requests, WoL & text over TCP”, “Start setup”, “Configure custom entities”
-
Enter the Configuration: Delete any existing template code and paste in the provided YAML for this setup (below). You will need to update the ip address in the provided YAML to send the commands to the Global Caché IP2SL-P. EX: replace the XX.XX in the code “address: &itach_ip 192.168.XX.XX:4999” to reflect the ip of the Global Caché IP2SL-P.
-
A new entity will be created: called “Orei_Switcher”, select the device before completing the setup.
Note on Anchors: The &itach_ip creates a variable (Anchor) for the IP address. Every line with *itach_ip (an Alias) automatically uses that value. If the IP ever changes, you only update the single line with the & symbol.
Note on Carriage Return: The \r at the end of each command is the ‘Carriage Return.’ Without this, the OREI will receive the text but will not execute the action.”
Note: YAML is spacing-sensitive. Use two spaces for each indentation level. Do not use the Tab key, as it will cause the code to fail.
OREI_Switcher:
  Features:
    'On':
      Type: tcp-text
      Parameter:
        address: &itach_ip 192.168.XX.XX:4999
        text: power 1!\r
    'Off':
      Type: tcp-text
      Parameter:
        address: *itach_ip
        text: power 0!\r
  Simple Commands:
    OUT1_AUDIO_WIN1:
      Type: tcp-text
      Parameter:
        address: *itach_ip
        text: s output 1 audio 0!\r
    OUT1_AUDIO_HDMI1:
      Type: tcp-text
      Parameter:
        address: *itach_ip
        text: s output 1 audio 1!\r
    OUT1_AUDIO_HDMI2:
      Type: tcp-text
      Parameter:
        address: *itach_ip
        text: s output 1 audio 2!\r
    OUT1_AUDIO_HDMI3:
      Type: tcp-text
      Parameter:
        address: *itach_ip
        text: s output 1 audio 3!\r
    OUT1_AUDIO_HDMI4:
      Type: tcp-text
      Parameter:
        address: *itach_ip
        text: s output 1 audio 4!\r
    OUT2_AUDIO_WIN1:
      Type: tcp-text
      Parameter:
        address: *itach_ip
        text: s output 2 audio 0!\r
    OUT2_AUDIO_HDMI1:
      Type: tcp-text
      Parameter:
        address: *itach_ip
        text: s output 2 audio 1!\r
    OUT2_AUDIO_HDMI2:
      Type: tcp-text
      Parameter:
        address: *itach_ip
        text: s output 2 audio 2!\r
    OUT2_AUDIO_HDMI3:
      Type: tcp-text
      Parameter:
        address: *itach_ip
        text: s output 2 audio 3!\r
    OUT2_AUDIO_HDMI4:
      Type: tcp-text
      Parameter:
        address: *itach_ip
        text: s output 2 audio 4!\r
    OUT1_SOURCE_HDMI1:
      Type: tcp-text
      Parameter:
        address: *itach_ip
        text: s output 1 in source 1!\r
    OUT1_SOURCE_HDMI2:
      Type: tcp-text
      Parameter:
        address: *itach_ip
        text: s output 1 in source 2!\r
    OUT1_SOURCE_HDMI3:
      Type: tcp-text
      Parameter:
        address: *itach_ip
        text: s output 1 in source 3!\r
    OUT1_SOURCE_HDMI4:
      Type: tcp-text
      Parameter:
        address: *itach_ip
        text: s output 1 in source 4!\r
    OUT2_SOURCE_HDMI1:
      Type: tcp-text
      Parameter:
        address: *itach_ip
        text: s output 2 in source 1!\r
    OUT2_SOURCE_HDMI2:
      Type: tcp-text
      Parameter:
        address: *itach_ip
        text: s output 2 in source 2!\r
    OUT2_SOURCE_HDMI3:
      Type: tcp-text
      Parameter:
        address: *itach_ip
        text: s output 2 in source 3!\r
    OUT2_SOURCE_HDMI4:
      Type: tcp-text
      Parameter:
        address: *itach_ip
        text: s output 2 in source 4!\r
    OUT1_SINGLE:
      Type: tcp-text
      Parameter:
        address: *itach_ip
        text: s output 1 multiview 1!\r
    OUT1_PIP:
      Type: tcp-text
      Parameter:
        address: *itach_ip
        text: s output 1 multiview 2!\r
    OUT1_PBP:
      Type: tcp-text
      Parameter:
        address: *itach_ip
        text: s output 1 multiview 3!\r
    OUT1_TRIPLE:
      Type: tcp-text
      Parameter:
        address: *itach_ip
        text: s output 1 multiview 4!\r
    OUT1_QUAD:
      Type: tcp-text
      Parameter:
        address: *itach_ip
        text: s output 1 multiview 5!\r
    OUT2_SINGLE:
      Type: tcp-text
      Parameter:
        address: *itach_ip
        text: s output 2 multiview 1!\r
    OUT2_PIP:
      Type: tcp-text
      Parameter:
        address: *itach_ip
        text: s output 2 multiview 2!\r
    OUT2_PBP:
      Type: tcp-text
      Parameter:
        address: *itach_ip
        text: s output 2 multiview 3!\r
    OUT2_TRIPLE:
      Type: tcp-text
      Parameter:
        address: *itach_ip
        text: s output 2 multiview 4!\r
    OUT2_QUAD:
      Type: tcp-text
      Parameter:
        address: *itach_ip
        text: s output 2 multiview 5!\r
    OUT1_PBP_MODE1:
      Type: tcp-text
      Parameter:
        address: *itach_ip
        text: s output 1 PBP mode 1!\r
    OUT1_PBP_MODE2:
      Type: tcp-text
      Parameter:
        address: *itach_ip
        text: s output 1 PBP mode 2!\r
    OUT2_PBP_MODE1:
      Type: tcp-text
      Parameter:
        address: *itach_ip
        text: s output 2 PBP mode 1!\r
    OUT2_PBP_MODE2:
      Type: tcp-text
      Parameter:
        address: *itach_ip
        text: s output 2 PBP mode 2!\r
    OUT1_TRIPLE_MODE1:
      Type: tcp-text
      Parameter:
        address: *itach_ip
        text: s output 1 triple mode 1!\r
    OUT1_TRIPLE_MODE2:
      Type: tcp-text
      Parameter:
        address: *itach_ip
        text: s output 1 triple mode 2!\r
    OUT2_TRIPLE_MODE1:
      Type: tcp-text
      Parameter:
        address: *itach_ip
        text: s output 2 triple mode 1!\r
    OUT2_TRIPLE_MODE2:
      Type: tcp-text
      Parameter:
        address: *itach_ip
        text: s output 2 triple mode 2!\r
    OUT1_QUAD_MODE1:
      Type: tcp-text
      Parameter:
        address: *itach_ip
        text: s output 1 quad mode 1!\r
    OUT1_QUAD_MODE2:
      Type: tcp-text
      Parameter:
        address: *itach_ip
        text: s output 1 quad mode 2!\r
    OUT2_QUAD_MODE1:
      Type: tcp-text
      Parameter:
        address: *itach_ip
        text: s output 2 quad mode 1!\r
    OUT2_QUAD_MODE2:
      Type: tcp-text
      Parameter:
        address: *itach_ip
        text: s output 2 quad mode 2!\r
Provided commands in the code:
Power on the device: power 1!
Power off the device:  power 0!
Set Audio output 1 Win 1: s output 1 audio 0!
Set Audio output 1 HDMI 1: s output 1 audio 1!
Set Audio output 1 HDMI 2: s output 1 audio 2!
Set Audio output 1 HDMI 3: s output 1 audio 3!
Set Audio output 1 HDMI 4: s output 1 audio 4!
Set Audio output 2 Win 1: s output 2 audio 0!
Set Audio output 2 HDMI 1: s output 2 audio 1!
Set Audio output 2 HDMI 2: s output 2 audio 2!
Set Audio output 2 HDMI 3: s output 2 audio 3!
Set Audio output 2 HDMI 4: s output 2 audio 4!
Set Single Screen output 1 HDMI 1: s output 1 in source 1!
Set Single Screen output 1 HDMI 2: s output 1 in source 2!
Set Single Screen output 1 HDMI 3: s output 1 in source 3!
Set Single Screen output 1 HDMI 4: s output 1 in source 4!
Set Single Screen output 2 HDMI 1: s output 2 in source 1!
Set Single Screen output 2 HDMI 2: s output 2 in source 2!
Set Single Screen output 2 HDMI 3: s output 2 in source 3!
Set Single Screen output 2 HDMI 4: s output 2 in source 4!
Set muti-viewer mode output 1 Single Screen: s output 1 multiview 1!
Set muti-viewer mode output 1 PIP Screen: s output 1 multiview 2!
Set muti-viewer mode output 1 PBP Screen: s output 1 multiview 3!
Set muti-viewer mode output 1 Triple Screen: s output 1 multiview 4!
Set muti-viewer mode output 1 Quad Screen: s output 1 multiview 5!
Set muti-viewer mode output 2 Single Screen: s output 2 multiview 1!
Set muti-viewer mode output 2 PIP Screen: s output 2 multiview 2!
Set muti-viewer mode output 2 PBP Screen: s output 2 multiview 3!
Set muti-viewer mode output 2 Triple Screen: s output 2 multiview 4!
Set muti-viewer mode output 2 Quad Screen: s output 2 multiview 5!
Set PBP Mode output 1 Mode 1: s output 1 PBP mode 1!
Set PBP Mode output 1 Mode 2: s output 1 PBP mode 2!
Set PBP Mode output 2 Mode 1: s output 2 PBP mode 1!
Set PBP Mode output 2 Mode 2: s output 2 PBP mode 2!
Set Triple Mode output 1 Mode 1: s output 1 triple mode 1!
Set Triple Mode output 1 Mode 2: s output 1 triple mode 2!
Set Triple Mode output 2 Mode 1: s output 2 triple mode 1!
Set Triple Mode output 2 Mode 2: s output 2 triple mode 2!
Set Quad Mode output 1 Mode 1: s output 1 quad mode 1!
Set Quad Mode output 1 Mode 2: s output 1 quad mode 2!
Set Quad Mode output 2 Mode 1: s output 2 quad mode 1!
Set Quad Mode output 2 Mode 2: s output 2 quad mode 2!
Key Logic in this Step Examples: (For changing or modifying)
-
Entity Name (OREI_Switcher): This is the name that will appear in your Remote 3 list.
-
Features Section: The ‘On’ and ‘Off’ commands here allow the Remote 3 to use its standard Power buttons for your OREI.
-
Simple Commands Section: This creates a list of “one-tap” buttons for all your routing and multiview modes.
-
The Address (192.168.XX.XX:4999): This directs the signal specifically to the iTach’s Serial port.
-
The Terminator (\r): Essential for OREI. It signals the end of the command string.
-
The Formatting Rule: You must use two spaces for each indentation level. Never use the Tab key, as it will cause the YAML to fail.
5**. Mapping Commands to the UI**
-
Go to User Interface: select “activities and macros”, “+ Add new”, “Activity”.
-
Setup: Name the device Orei UHD-402MV
-
Select the entities to add to the activities: “Orei_Switcher”
-
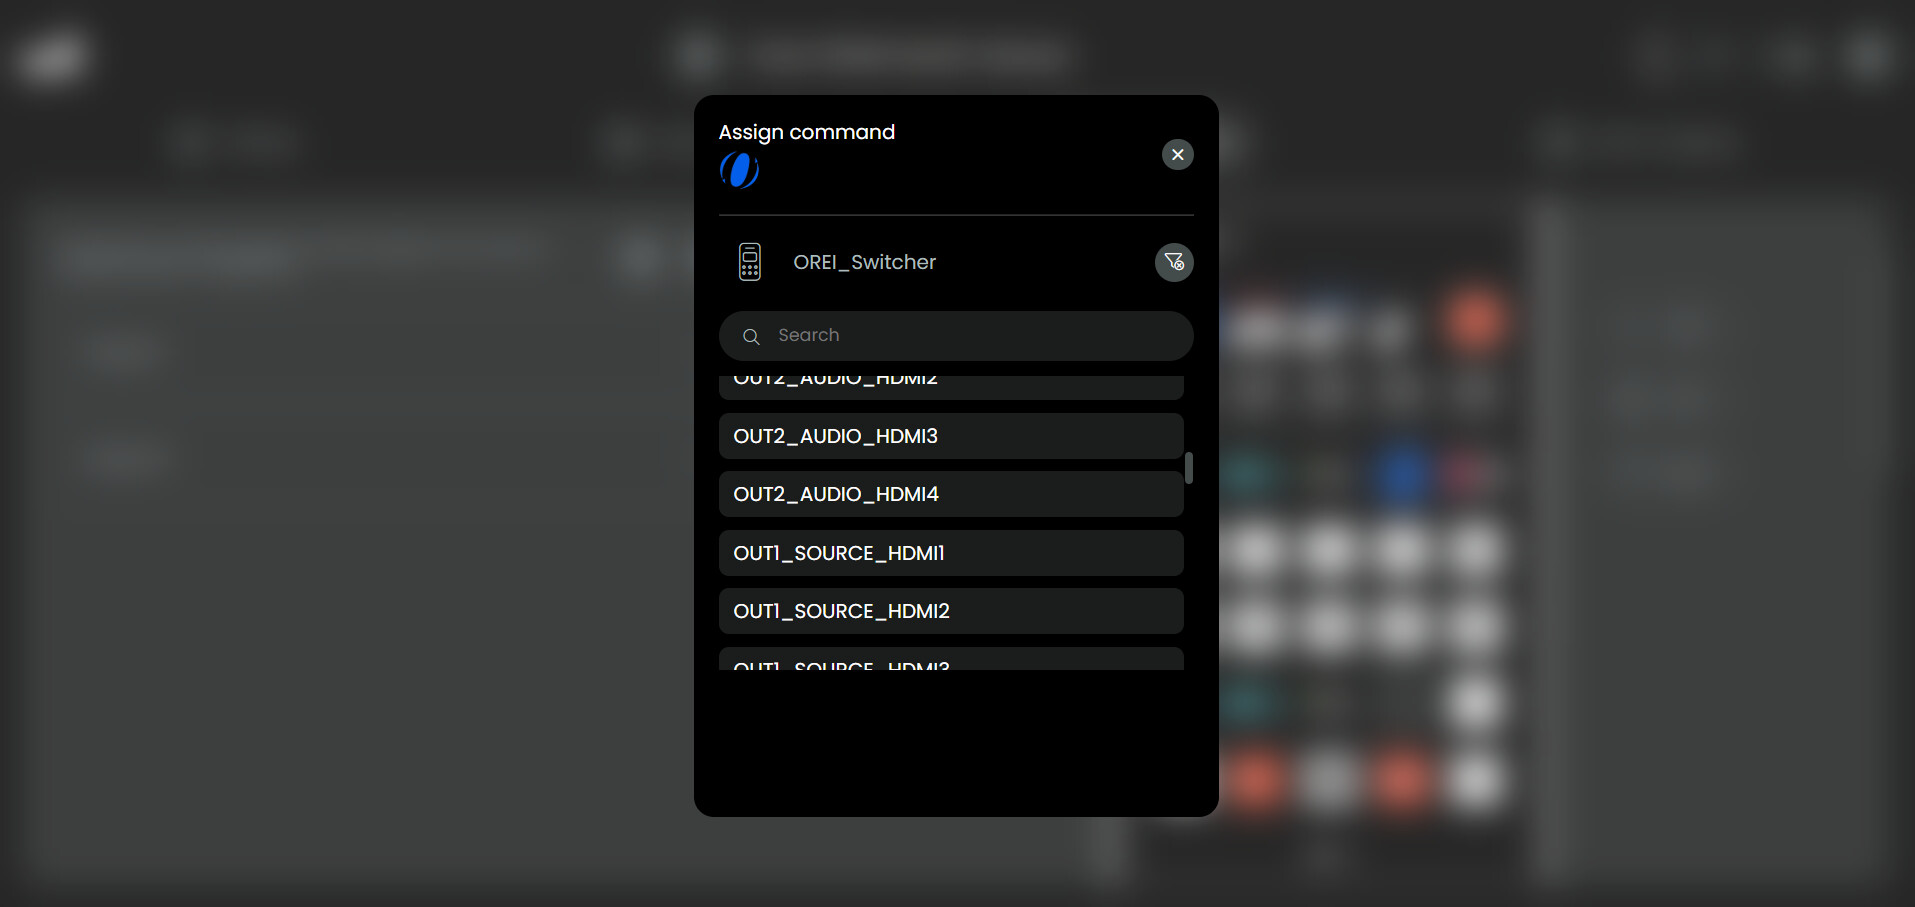
Navigate to “User Interface” or “Button Mapping”: You will now have the commands that were coded in the YAML in a dropdown available to map as you wish to the Remote 3.
How to Update or Expand Your Commands
To update your command list, you must perform a “Clean Reinstall” to clear the Remote 3’s configuration cache. Following these steps ensures your existing button maps and activities remain intact.
-
Preparation: Copy your updated, expanded YAML code to a safe place (like Google Docs).
-
The “Double Delete”:
-
Go to Settings > Integrations.
-
Delete the “HTTP requests, Wol & text over TCP” integration.
-
Important: If it remains visible, delete it a second time. It must be completely gone from the list to clear the old cache.
-
-
Preserve Activities: Do NOT remove any OREI_Switcher entities from your activities or macros. The remote will maintain the “index” for your button maps as long as you leave the UI alone.
-
Re-install & Configure Entities:
-
Click Add new / Install custom and upload the .tar.gz file again.
-
During the setup, go to Configure custom entities.
-
Crucial: Manually delete all the default template text from the box, then paste in your new YAML code.
-
-
Select the Entity:
- Once the YAML is pasted, the system will recognize the new entity. You must select the “OREI_Switcher” entity from the list before proceeding to the final step.
-
Finish Setup: Complete the installation.
**Why this works:**The Remote 3 uses an internal index. By leaving your activities alone, you leave the “socket” open. When you reinstall the integration with the same entity name (OREI_Switcher), the remote plugs the new data into the old socket, saving you from having to re-map 30+ buttons.
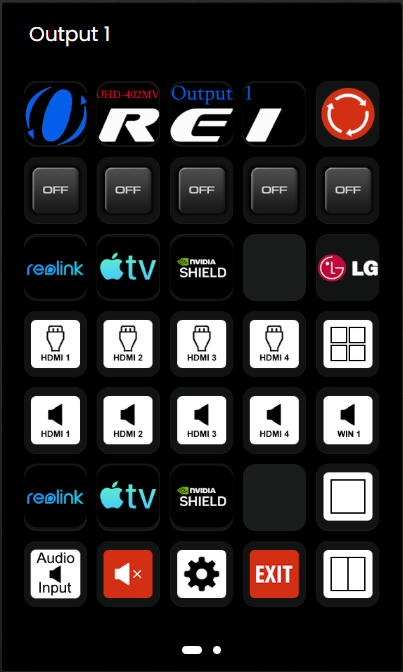
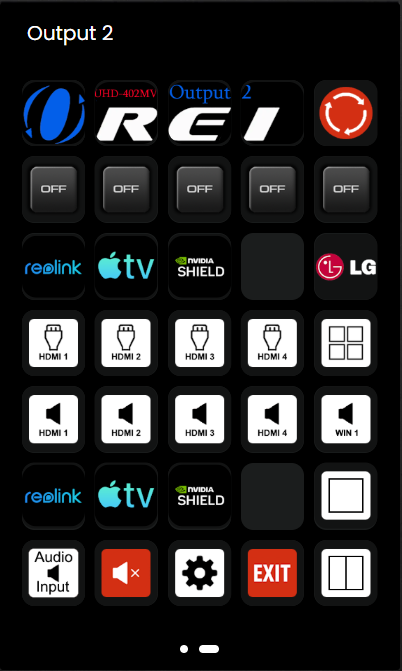
The Final Result: A Pro-Grade Matrix Interface
The Power of RS-232
The power of RS-232 has allowed me to gain total control over the OREI UHD-402MV. By combining these serial commands with integrations for all my connected hardware, I’ve created a comprehensive matrix control system that manages the power states, video, sound output, and multi view controls all in one central location. I can now create powerful macros that simplify control to single button presses and access controls that were not available any other way through the traditional IR remote. This is still a work in progress being only a week in the works, but I would like to continue to work on developing this concept.
What I achieved so far:
-
Dual-Output Matrix Control: I have configured the interface to manage two separate displays simultaneously. Using two dedicated pages on the remote, I can independently control power, video inputs, and sound selection for Output 1 and Output 2. This allows for any configuration: you can “mirror” the same source to both TVs, or watch two completely different devices at once. You can even share a single TV with someone else using the split-screen mode; one person can listen to their source via headphones while the other streams their audio directly to the TV.
-
One-Touch Macros: I’ve built macros that turn on a specific device while simultaneously switching the TV, the respective OREI HDMI input in full screen mode, and the correct audio channel—all with a single press (icons in the bottom row).
-
Focused Multiviewing: I can now switch between Fullscreen and Split-screen layouts instantly. I specifically avoided the clutter of PIP or Quad-view to keep the interface streamlined and the images large and clear. There are still the original IR commands that cycle through the PIP or Quad-view modes, but I’ve focused on the layouts that work best for my setup.
-
Intuitive Individual Control: I’ve mapped individual power toggles for every connected device—Reolink, Apple TV, Nvidia Shield, and the LG TV (Top row icons). I even have one HDMI input still available, leaving room to add a PC or another device in the future.
-
Guest-Friendly Design: By organizing the UI logically, I’ve made a complex dual-output system approachable. Anyone can pick up the remote and intuitively understand how to switch sources or change the view on either screen without a tutorial.
-
The “Exit” Strategy: I included a dedicated “Emergency Stop” button that executes a full system shutdown macro, ensuring every device and display powers off correctly when I’m done.
Final Thoughts
This project started with a “pain in the neck” IR remote and a week of learning about a 60-year-old protocol (RS-232). In the end, it was worth every hour of the “rabbit hole.” I now have a system that is robust, responsive, and—most importantly—simple to use.
If you have a device with a serial port, don’t ignore it. It’s the key to taking your Remote 3 from a simple “clicker” to a true command center. I really do hope this post is well received and Unfolded Circle takes note of the insane potential of RS-232 being the backbone of my setup. Until then, big shout out to kennymc-c and the ucr2-integration-requests. This is the way…for now.
I’d love to hear your thoughts, whether it’s suggestions, criticisms, or seeing what you’ve built yourself. If you’ve tackled a similar setup or found a better way to handle matrix switching, please share it below!